Below you will find general instructions for rebuild most rocking piston compressors.
The process is generally the same for all pumps regardless of brand.
With the exception that some pumps have 1 connecting rod screw, some have 4, some have 2, etc. The Process for installing is the same.
1.Remove the screws that hold the compressor heads in place. When removing the heads, be sure to keep each head and its components with the correct compressor side.
2.Check for proper placement of or damage to the gaskets on the bottom of the compressor heads. Replace if damaged.
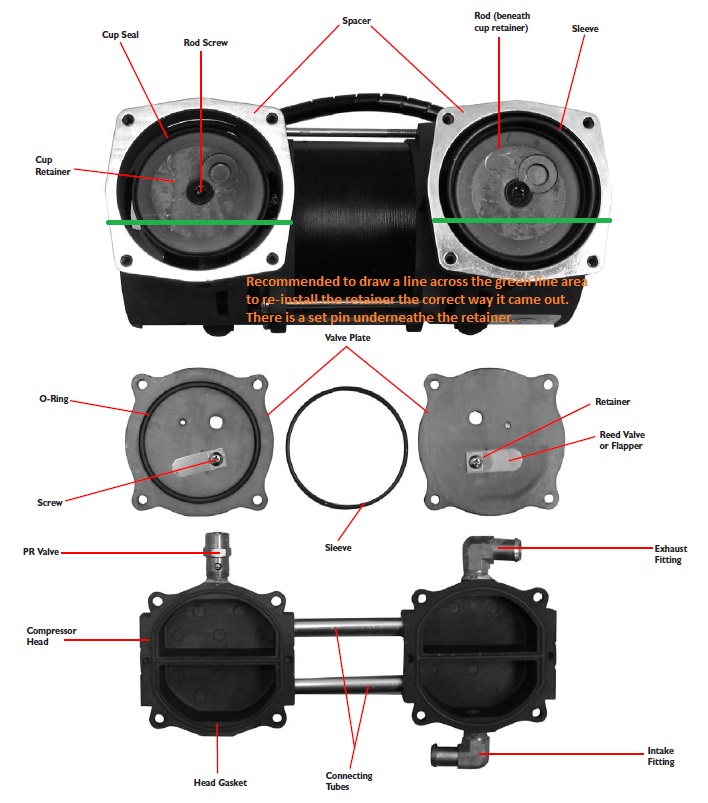
3.Remove reed valve plates. A reed valve is located on each side of the valve plate.
4.The compressor reed valves should be flush with the valve plate. If The valve is broken or not flush with the valve plate, or foreign matter is detected inside the head, clean or replace the compressor reed valves.
4A. To replace the compressor reed valves. Remove the screw holding the compressor reed valves in position on the valve plate and discard the used reed valves.
b.Position the new reed valves so that they are centered and completely cover the holes in the valve plate.c.Place the metal retainer on the reed valves and secure with the reed valve screw.
5.Check for proper placement of or damage to the rubber o-ring on the bottom of the valve plate. Replace if damaged.
6.Remove piston sleeves by pulling upward and inspect the cup seal on pistons. Replace if badly worn or damaged.
To replace cup seal:
a.Remove rod screw from top of piston.
b.Remove the cup retainer plate.
c.Discard defective cup seal.
d.Place new cup seal into position.
e.Replace cup retainer plate.
f.Secure with screws.
7.Reposition sleeve on piston.noTe–In some cases, it may be easier to position sleeve on piston before installing a new cup seal and retainer plate.
8.Place valve plates on the compressor so that heads of reed valve screws are aligned with the indentation on top of pistons.
9.Install the compressor heads so that the holes in the heads are aligned with the holes in the compressor housing.
10. Secure compressor heads with the screws
TIPS and Helpful insights
Cup Seal Removal:
Most screws that hold the retainer on will have Loctite previously installed. It is recommended to heat the retainer up with a torch for a minute or two to loosen this.
NOT doing so may cause the screw to strip and in some cases the whole pump must be replaced. ** Especially on Gast models.
Cup Seal Installation:
The easiest way to reinstall the CUP seal onto the connecting rod is to rotate the rod to the top of the sleeve with the fan blades on the side. HOLD the fan blade in place with the rod at the top of the sleeve. Place the cup seal on the rod, place the retainer on top of the cup seal - screw in place while holding the rod by the cooling fan in place. Rotate this one to the bottom and perform the same thing on the other side.
**** On some models, it is easier to have the cylinder sleeve lying flat on a work bench. Place the cup seal on top of the sleeve, place the retainer on top of the cup seal and with even pressure by your palm push the retainer and cup seal gently into the sleeve. IF it is bent, crooked, or deformed after this then you would need to remove and try again.
Then you can place this on the connecting rod and screw it down.
Typically only works on Gast models.
Reed Valve / Flapper Valve Installation:
To install flapper valves and the retainer on top is generally done by holding the 2 pieces with needle nose pliers and tightening.